My name is Anaxagoras, one of the Seven Sages of the Grove of Epiphany, founder of the Nousporists. Now, don't make me repeat the following again. Rule number one: Do not call me Anaxa. Rule number two: Never interrupt me — silence is golden. Remember that.
Voice Actors ―
EN: Stephen Fu
CN: Qian Wenqing (钱文青)
JP: Uchida Yuma (内田 雄馬)
KR: Lee Sang-jun (이상준)
Introduction

⟢ Anaxa is a Limited 5-Star Wind Erudition character in Honkai: Star Rail, who's largely recognized for his versatility and clearing end-game content at a relatively low cost. He can be played either as a Hypercarry DPS or in Dual-DPS comps.This guide will cover both playstyles and discuss the most optimal Relics and Light Cones, which Skills and Eidolons to prioritize, and his premium teams and synergies.DISCLAIMER: This guide is made for casual players. If you are interested in minmaxing or 0-cycling, please look elsewhere or try asking in our discord.
This website is best viewed on Desktop
For detailed Anaxa calculations, please see the following spreadsheets:
⟢ Hypercarry: camaraderia + cerydra minisheet (camaraderia)
⟢ The Herta: camaraderia, maackia
This guide was made by camaraderia, gunzing, and togepi_ from the Anaxa Mains Theorycrafting Team in association with @anaxapics. Special thank you to pileodirt for their contribution in our Breaknaxa section. If you have any questions or feedback, please join our Discord Server and reach out to the team!
Kit Overview

Base Stats ―
HP 970
ATK 757
DEF 558
SPD 97
Stat Bonuses ―
Wind DMG% 22.4%
CRIT Rate 12%
HP 10%
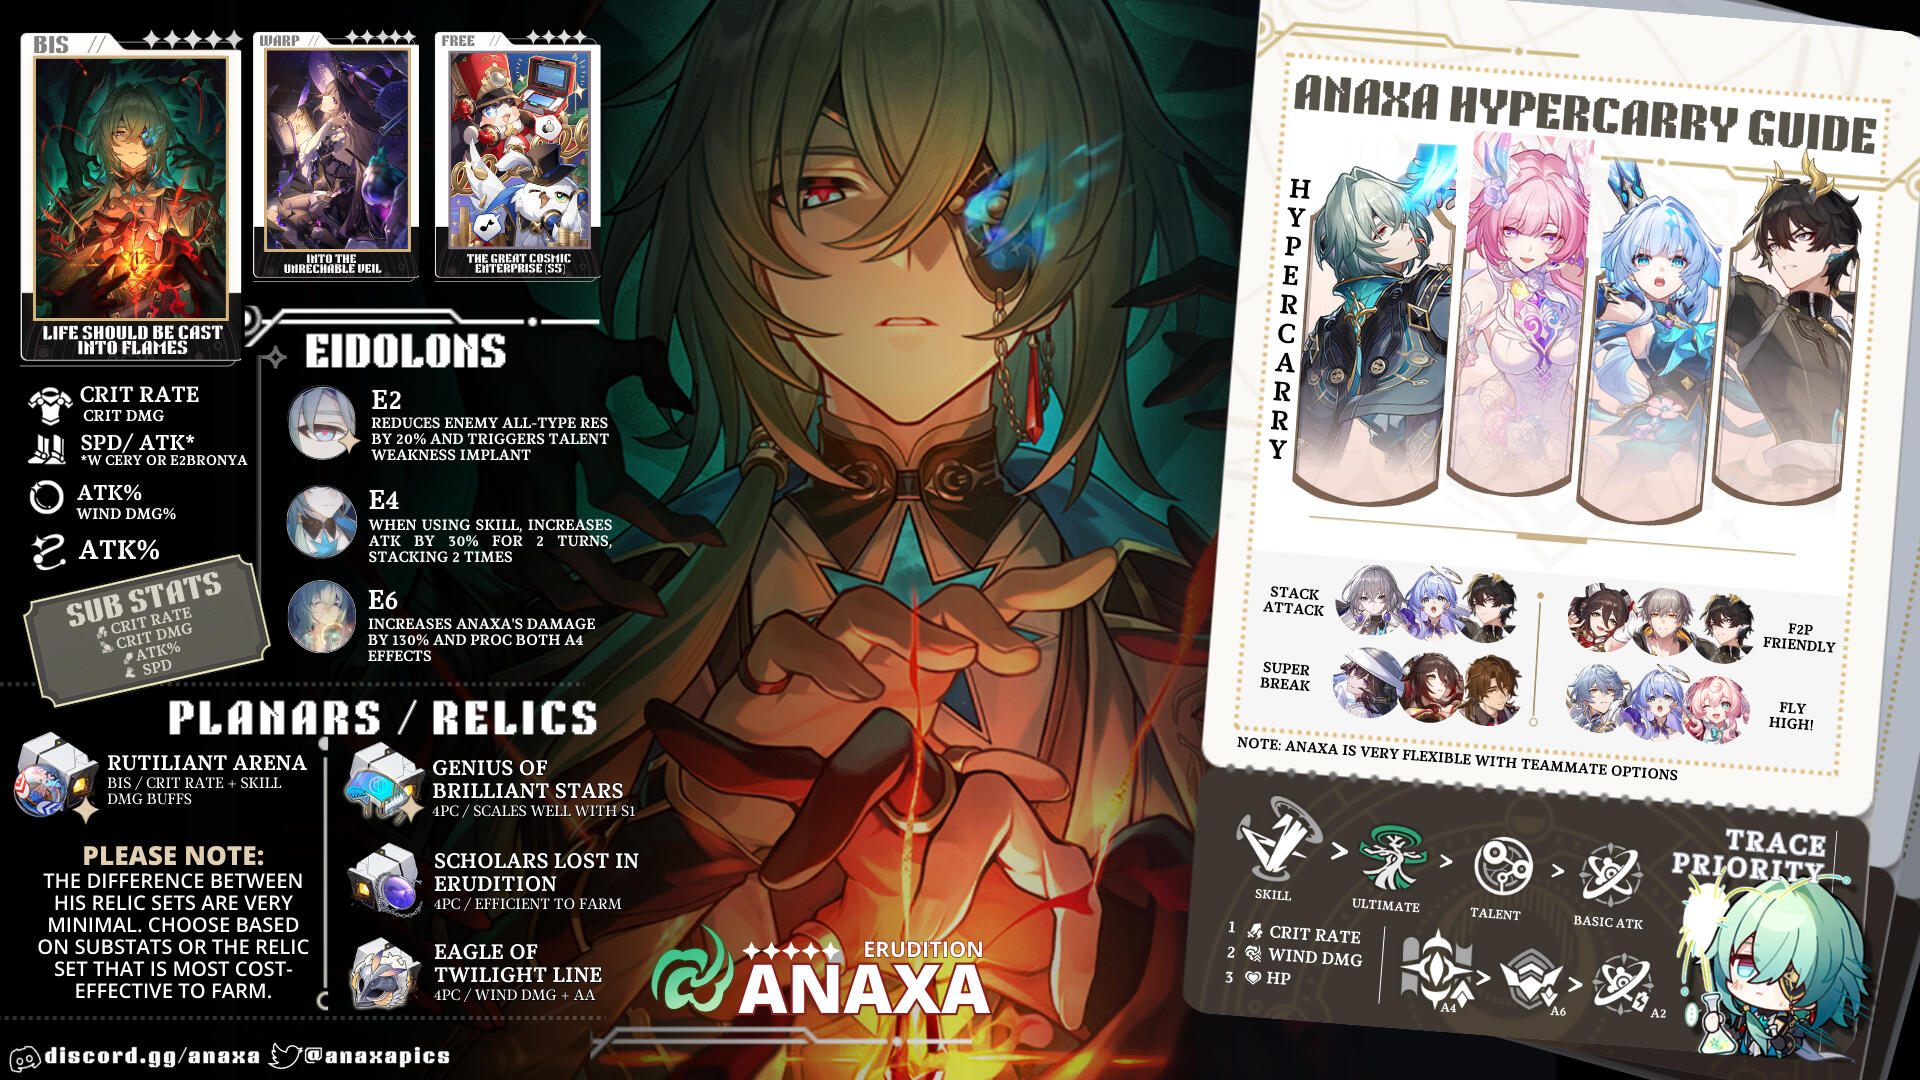
Skill Priority
Skill > Talent > Ultimate > Basic
Notes: Anaxa’s Skill is a no-brainer, as it's the primary source of his damage and gets fired a second time when there are 5 different Weakness Types on the main enemy target. Additionally, his Talent and Ultimate are quite close in performance upon varying levels, but along with his Basic ATK, they should all be leveled to the maximum capacity.
Skills

Basic ATK | Pain, Brews Truth
[Single Target]
Deals Wind DMG equal to 100% of Anaxa's ATK to one designated enemy.Energy Regeneration: 20
Weakness Break (ST): 10
Notes: Thanks to Anaxa's A2 Trace "Roaming Signifier", his Basic ATK generates the same Energy as his Skill; making his rotations quite comfortable. As such, we recommend leveling his Basic ATK.

Skill | Fractal, Exiles Fallacy
[Bounce]
Deals Wind DMG equal to 70% of Anaxa's ATK to one designated enemy and additionally deals 4 instance(s) of DMG. Each instance of DMG deals Wind DMG equal to 70% of Anaxa's ATK to one random enemy, prioritizing Bouncing to enemy targets that have not been hit by this instance of Skill.
When used, for each attackable enemy on the field, this Skill has its DMG dealt increased by 20%.Energy Regeneration: 6
Weakness Break (ST): 10
Notes: It’s quite self-explanatory, but if you’re confused: against 5 enemies, every enemy will receive a DMG multiplier of 70%, and against 1 enemy, the enemy will receive a 350% DMG multiplier. Anaxa’s Bounce is "smart"—meaning all enemies will be hit at least once, unlike regular Bounce which is random.It is important to ensure the primary target has the green star overhead, or Anaxa will not activate his second Skill via his Talent.

Ultimate | Sprouting Life Sculpts Earth
[AoE]
Inflicts the "Sublimation" state on all enemies, then deals Wind DMG equal to 160% of Anaxa's ATK to all enemies.
In the "Sublimation" state, the targets will be simultaneously inflicted with Physical, Fire, Ice, Lightning, Wind, Quantum, and Imaginary Weaknesses, lasting until the start of the targets' turn. If the targets do not have Control RES, they are unable to take action in the "Sublimation" state.Energy Regeneration: 5
Weakness Break (AoE): 20
Notes: With The Herta, you’ll want to save this often; he has no innate way to gain Energy out of his turn, and you don’t want to inflict “Sublimation” on enemies about to die. If an Enemy (and Anaxa) is about to act, and no enemy has 5 Weaknesses present, don’t use the Ultimate before their turn. “Sublimation” will wear off, and Anaxa will lose a chance to use his Skill twice.

Talent | Tetrad Wisdom Reigns Thrice
[Impair]
Each time Anaxa lands 1 hit on enemy targets, inflicts 1 Weakness of a random Type to the targets, lasting for 3 turn(s), with priority to the Weakness Type that the target doesn't already possess.
While Anaxa is on the field, inflicts the "Qualitative Disclosure" state on enemy targets that have at least 5 different Types of Weaknesses. Anaxa deals 30% increased DMG to targets afflicted with the "Qualitative Disclosure" state. In addition, after using Basic ATK or Skill on them, unleashes 1 additional instance of Skill on the targets. This additional Skill does not consume any Skill Points and cannot trigger this effect again. If the target has been defeated before the additional Skill is used, it will be cast on one random enemy instead.
Notes: As explained in the ‘Skill’ section, ensure you don’t use the Skill carelessly! The primary enemy target should always have "Qualitative Disclosure", or he won't Skill twice. While this seems obvious, it is possible to miss it.

Technique | Prism of the Pupil
[Impair]
After using Technique, inflicts the Terrified state on enemies in a set area. Terrified enemies will flee in a direction away from Anaxa for 10 second(s). When allies enter battle via actively attacking a Terrified enemy, it will always be considered as entering battle via attacking a Weakness. After entering battle, Anaxa applies 1 Weakness of the attacker's Type to every enemy target, lasting for 3 turn(s).
Notes: To capitalize on his Technique, try to initiate the battle with a character whose Element is not included in the Enemy Weakness. Inflicting another unique element at the start of the battle gives you a head start on reaching the 5 Weakness Types requirement for "Qualitative Disclosure". However, if you have another character in the party whose technique targets the active character (e.g., Cerydra), you can ignore the aforementioned advice and enter the battle with Anaxa.
Ascension Trace Priority
A4 ≥ A2 = A6
Notes: Anaxa’s Ascension 4 is too good to miss out on—Anaxa will still function properly so long as you have this trace enabled. While his other Ascension Traces don’t quite match up to that level of amplification, they both provide buffs via utility and damage that shouldn’t be overlooked.

Ascension 2 | Roaming Signifier
When using Basic ATK, additionally regenerates 10 Energy. At the start of the turn, if there are no enemy targets in the "Qualitative Disclosure" state, immediately regenerates 30 Energy.
Notes: This Ascension, along with his Signature, guarantees that Anaxa regenerates his Ultimate on his first turn. Additionally, this Ascension will relieve the worry of a lack of Energy when Anaxa’s Skill is not needed.

Ascension 4 | Imperative Hiatus
Based on the number of "Erudition" characters in the team, one of the following effects will be triggered in the current battle:
- 1 character: Increases Anaxa's CRIT DMG by 140%.
- At least 2 characters: Increases DMG dealt by all allies by 50%
Notes: A priority for anyone using Anaxa. Not much needs to be said, but to clear up a confusion: If Anaxa is the only Erudition in the party, he will gain 140% CRIT DMG. If Anaxa and another Erudition (or more) are present, he will lose 140% CRIT DMG, and all allies (including Anaxa) will gain 50% DMG.

Ascension 6 | Qualitative Shift
For every 1 different Weakness Type an enemy target has, the DMG that Anaxa deals to that target ignores 4% of their DEF. Up to a max of 7 Weakness Types can be taken into account for this effect.
Notes: Anaxa will gain 28% DEF Shred against an enemy with 7 Weakness Types. This incentivizes wearing Genius of Brilliant Stars, especially with his Signature Light Cone.
Eidolon Priority
E2 > E6 > E4 > E1
When vertically investing into Anaxa, Eidolon 2 is his best.While his Eidolon 1 is great for DEF Shred, investing or obtaining his best supports (such as Robin, Cerydra, or Sunday) will yield more worthwhile results.His Eidolon 6 is his highest relative increase; granting him up to 50% more total DMG over his Eidolon 5.Lastly, while his Eidolon 4 is a quite unusual stopping point for vertical investment, it’s still a relatively high increase regardless.
⟢ E1 or S1?
Anaxa’s Signature Light Cone grants much more flexibility, damage, and utility than his Eidolon 1–get his Signature Light Cone instead!
Eidolons

1. Magician, Isolated by Stars
After using Skill for the first time, recovers 1 Skill Point(s). When using Skill to hit enemy targets, decreases the targets' DEF by 16%, lasting for 2 turn(s).
Hypercarry 1T% Gain:
From E0: 11.17%
From Previous: 11.17%
Anaxa + The Herta % Gain:
From E0: 9.59%
From Previous: 9.59%
Notes: Strong damage increase. This Eidolon gets better with more DEF Shred sources, up to 100%. E.g., Pela, Genius of Brilliant Stars, E1 Ruan Mei, E1 Cerydra, etc.

2. Soul, True to History
When enemy targets enter the battlefield, triggers 1 instance of the Talent's Weakness Implant effect, and reduces their All-Type RES by 20%.
Hypercarry 1T% Gain:
From E0: 28.96%
From Previous: 15.55%
Anaxa + The Herta % Gain:
From E0: 27.39%
From Previous: 16.25%
Notes: Strong damage increase. Not only for his personal damage, but for damage-dealing allies, like The Herta, Tribbie, and Robin.

3. Pupil, Etched into Cosmos
Ultimate Lv. +2, up to a maximum of Lv. 15.
Basic ATK Lv. +1, up to a maximum of Lv. 10.
Notes: Poor damage increase that slightly increases his Ultimate and Basic ATK% multipliers.

4. Blaze, Plunged to Canyon
When using Skill, increases ATK by 30%, lasting for 2 turn(s). This effect can stack up to 2 time(s).
Hypercarry 1T% Gain:
From E0: 48.61%
From Previous (E2): 15.11%
Anaxa + The Herta % Gain:
From E0: 37.35%
From Previous (E2): 7.82%
Notes: Strong damage increase, granting Anaxa up to 60% ATK.

5. Embryo, Set Beyond Vortex
Skill Lv. +2, up to a maximum of Lv. 15.
Talent Lv. +2, up to a maximum of Lv. 15.
Notes: Noticeable damage increase, slightly increasing Anaxa’s main source of damage’s DMG Multiplier.

6. Everything Is in Everything
The DMG dealt by Anaxa is 130% of the original DMG. The 2 effects in the Trace "Imperative Hiatus" will be triggered directly and will no longer depend on the number of "Erudition" characters in the team.
Hypercarry 1T% Gain:
From E0: 138.41%
From Previous (E4): 55.91%
Anaxa + The Herta % Gain:
From E0: 63.42%
From Previous (E4): 18.98%
Notes: Strongest damage increase, granting Anaxa both 50% DMG and 140% CRIT DMG. Additionally, increases all of his damage by 30%.
For detailed calculations, please see the following spreadsheets:
⟢ Anaxa Hypercarry (camaraderia)
⟢ Anaxa + The Herta (camaraderia)
⟢ Anaxa + The Herta (maackia)
Hypercarry Guide
⟢ Why Anaxa?
Anaxa is an Erudition unit that is secretly a Hunt unit, because he excels in Single-Target scenarios thanks to his efficient Bounce mechanic. He also ignores elemental match-ups easily, as he can implant all 7 Weakness himself.

For detailed calculations, please see the following spreadsheets:
⟢ Anaxa Hypercarry (camaraderia)
⟢ Anaxa Cerydra Minisheet (camaraderia)
If you have questions, please join our Discord Server & ask our team in the Theorycrafting Section!
Main & Sub Stats
Main Stats
Body - CRIT Rate > CRIT DMG
Boots - SPD or ATK% with Cerydra or Bronya E2
Planar Sphere - ATK% > Wind DMG%
Link Rope - ATK% > ERR

Body: CRIT Rate or CRIT DMG?
⟢ CRIT Rate
In Hypercarry setups, Anaxa grants himself 140% CRIT DMG from his A4 Trace, so CRIT DMG stats are less desirable due to diminishing returns. As such, Anaxa has ample room to reach 100% CRIT Rate through sub stats and a CRIT Rate Body. In fact, it's possible for an ATK% Body can be marginally better than CRIT DMG, purely because he is deprived of ATK!
Boots: SPD or ATK%?
⟢ SPD Boots
When paired with an Action Advancer such as Sunday or Bronya, SPD boots are almost always necessary for the classic -1 SPD setup.
E.g., 135 SPD Anaxa → 134 SPD Sunday to pull Anaxa back up → Anaxa additional turn⟢ ATK% Boots
Cyrene - She grants Anaxa an immediate action upon unleashing her Ultimate, making SPD boots unnecessary.Cerydra - Due to her Bonus Ability "Vici", which grants 20 SPD to herself and her target ally, Anaxa can equip ATK% Boots and still reach the 135 SPD needed for the -1 setup through substats.Bronya E2 - Her 2nd Eidolon grants Anaxa a 30% SPD buff after using her Skill, which translates to an additional 29.1 SPD for Anaxa, totalling to 126.1 SPD with no additional stats (97 Base SPD x 1.3 = 126.1 SPD). This means Anaxa only needs 105.9 SPD to reach the 135 threshold.
Eagle of Twilight Line
Thanks to the 25% Action Forward granted after using his Ultimate while wearing Eagle, Anaxa can equip ATK% Boots and push himself ahead of the 100% Action Advance unit; simulating the -1 setup with just a few SPD sub stats. Please note that Sparkle does not work due to her 50% Action Advance, meaning our only options are currently Sunday or Bronya.IMPORTANT: To simulate the -1 setup using Eagle, Anaxa must use his Ultimate after his turn granted by your Action Advancer to stay in sync for the remainder of the battle. In addition to this, Anaxa must reliably charge up his Ultimate every 2 turns, meaning his Signature Light Cone is often required.
↳ How much SPD does my Anaxa need with Eagle?
If your Bronya is at E2, a -1 setup can be simulated with Anaxa at base SPD. However, for all other scenarios, Anaxa's SPD is dependent on how fast your 100% Action Advance unit is. To determine how much SPD your Anaxa needs to push ahead of your 100% Action Advance unit, use the following formula:
(Action Advance unit SPD x 0.75) + 0.1 = SPD Anaxa Needs to Push Ahead
Tip: use Fribbels to view your showcased characters' SPD decimals.
Example with 134.0 SPD Sunday:
(134 x 0.75) + 0.1 = 100.6 SPD Anaxa Needs to Push Ahead
Round up to 101 SPD to be safe.
For your convenience, we have provided a calculator below!
Planar Sphere: ATK% or DMG%?
⟢ ATK% is much better, as Anaxa has an abundance of DMG% buffs and is deprived of ATK. It's much easier to farm for anyway, so save yourself the headache!
Link Rope: ATK% or ERR%?
⟢ Anaxa loses too much DMG using an ERR% Rope in Hypercarry team compositions, so stick with ATK%.
Sub Stats
SPD (until desired breakpoint) > CRIT Rate ≥ CRIT DMG > ATK% > Flat ATK
Notes:
Anaxa already provides himself with 140% CRIT DMG, which further increases the value of CRIT Rate.Important SPD Breakpoints to take note of:
⟢ 134 - 2 actions in the first cycle
⟢ 143 - 5 actions in the first two cycles

Art by @anaxadoodles
Relic Sets

Genius of Brilliant Stars
2PC: +10% Quantum DMG%
4PC: When the wearer deals DMG to the target enemy, ignores 10% DEF. If the target enemy has Quantum Weakness, the wearer additionally ignores 10% DEF.
Notes: Genius of Brilliant Stars scales tremendously with coexisting sources of DEF Shred or Ignore. For instance, Anaxa ideally possesses 28% DEF Ignore. Combined with his Signature Light Cone, a total of 12% DEF Shred is added to the tally. Just these three alone grant him 60% DEF Shred/Ignore, easily making this Relic Set an exceptional option.

Eagle of Twilight Line
2PC: +10% Wind DMG%
4PC: After the wearer uses their Ultimate, their action is Advanced Forward by 25%.
Notes: While Eagle of Twilight Line seems like a counter-intuitive option with supports like Sunday or Bronya, Anaxa can take advantage of this set by wearing ATK% Boots, and using his Ultimate after his turn granted by Sunday. Players should be careful only to use it then, as any other assortment will cause Anaxa not to gain an additional turn.

Scholar Lost in Erudition
2PC: +8% Crit Rate.
4PC: Increases DMG dealt by Skill and Ultimate by 20%. After using Ultimate, additionally increases the DMG dealt by the next Skill by 25%.
Notes: A regular set. Players should keep in mind that the Skill activated via Anaxa’s Talent is rarely able to make use of this buff.

Pioneer Diver of Dead Waters
2PC: +12 DMG% against debuffed enemies.
4PC: Increases CRIT Rate by 4%. The wearer deals 8%/12% increased CRIT DMG to enemies with at least 2/3 debuffs. After the wearer inflicts a debuff on enemy targets, the aforementioned effects increase by 100%, lasting for 1 turn(s).
Notes: Another generic relic set–it doesn’t offer Anaxa much, other than stats he is already self-sufficient in.

Wavestrider Captain
2PC: Increases CRIT DMG by 16%.
4PC: When the wearer becomes the target of another ally target's ability, gains 1 stack of "Help," stacking up to 2 time(s). If there are 2 stack(s) of "Help" when the wearer uses their Ultimate, consumes all "Help" to increase the wearer's ATK by 48% for 1 turn(s).
Notes: A viable option for Anaxa under the condition that he uses his Ultimate at the start of his turn to ensure the ATK% buff is applied to his Skill.
Final notes regarding Relic Sets:
All of his relic options perform quite similarly, so you're safe to use the set that has the best sub stats. It's important to keep in mind that both Eagle and Wavestrider requires you to time his Ultimate appropriately, otherwise you may lose out on the benefits of those sets.
Planar Ornaments

Rutilant Arena
2PC: Increases the wearer's CRIT Rate by 8%. When the wearer's current CRIT Rate reaches 70% or higher, DMG dealt by Basic ATK and Skill increases by 20%.
Notes: This Planar Set is his “go-to” and most consistent option. Nothing quite beats its consistency and flexibility in Hypercarry team compositions.

The Wondrous BananAmusement Park
2PC: Increases the wearer's CRIT DMG by 16%. When a target summoned by the wearer is on the field, CRIT DMG additionally increases by 32%.
Notes: A great Planar Set when paired with Dan Heng • Permansor Terrae, as he grants Anaxa the summon "Souldragon".

Firmament Frontline: Glamoth
2PC: Increases the wearer's ATK by 12%. When the wearer's SPD is equal to or higher than 135/160, the wearer deals 12%/18% more DMG.
Notes: This Planar Set is a close contender, but as you’d assume: Anaxa is usually never able to activate the second tier of this Planar Set.

Space Sealing Station
2PC: Increases the wearer's ATK by 12%. When the wearer's SPD reaches 120 or higher, the wearer's ATK increases by an extra 12%.
Notes: A regular statstick that grants Anaxa 24% ATK assuming he possesses over 120 SPD.
Final notes regarding Planar Ornaments:
These Planar Sets are extremely close in performance. While Rutilant Arena is numerically outperforming other options on paper, if Anaxa is provided sufficient ATK, the difference will be more than minimal.
Light Cones

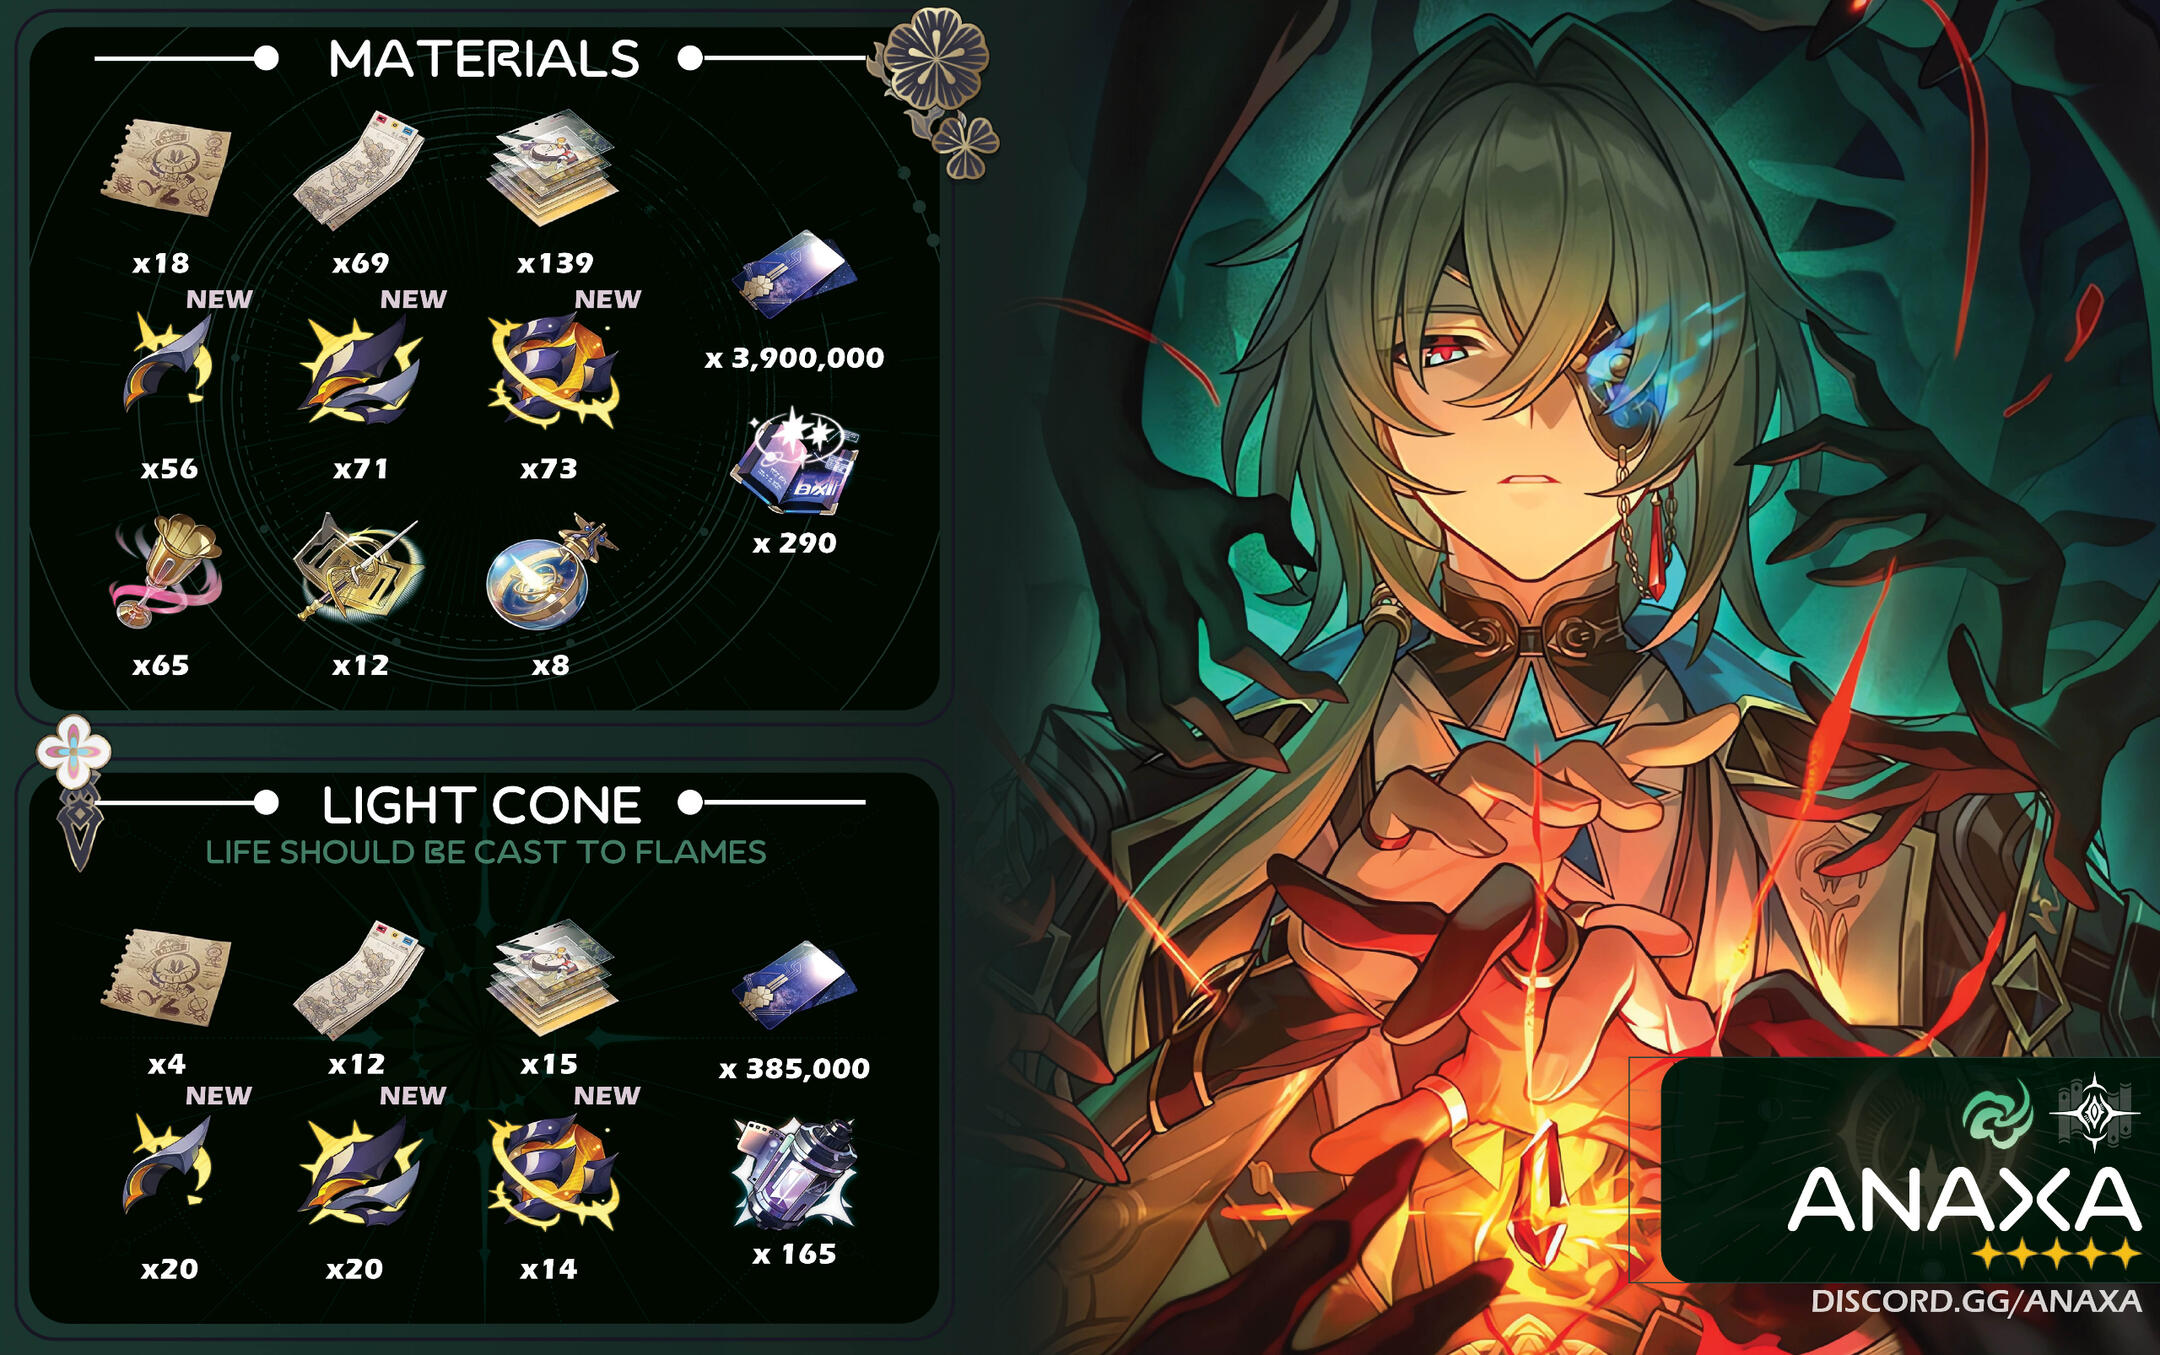
Life Should Be Cast to Flames
✦✦✦✦✦
When the wearer's turn starts, regenerates 10 Energy. If the enemy target has a Weakness implanted by the wearer, increases the wearer's DMG dealt to it by 60% / 70% / 80% / 90% / 100%.
When an enemy target gets attacked by the wearer, the wearer decreases the target's DEF by 12% / 15% / 18% / 21% / 24%, lasting for 2 turn(s). The same types of effects cannot stack.
Notes: His best and Signature Light Cone, granting him a consistent 2-turn Ultimate, as well as 60% DMG. As DEF reduction would ensue, this Light Cone gets better the more DEF Shred sources exist in the team (Pela, Genius of Brilliant Stars, E1 Ruan Mei, E1 Sunday, etc).

Into the Unreachable Veil
✦✦✦✦✦
Increases the wearer's CRIT Rate by 12% / 14% / 16% / 18% / 20%. When the wearer uses their Ultimate, increases DMG dealt by the wearer's Skill and Ultimate by 60% / 70% / 80% / 90% / 100%, lasting for 3 turn(s). After the wearer uses their Ultimate, if this Ultimate consumed 140 or more Energy, recovers 1 Skill Point.
Notes: With similar damage amplification to the aforementioned Light Cone, Herta’s Signature Light Cone provides slightly less damage but more utility than his Signature Light Cone, as SP is granted consistently.

The Great Cosmic Enterprise
✦✦✦✦
Increases the wearer's ATK by 8% / 10% / 12% / 14% / 16%. For every 1 different Weakness Type an enemy target has, increases the DMG dealt to it by the wearer by 4% / 5% / 6% / 7% / 8%. Up to a max of 7 Weakness Types can be taken into account for this effect.
Notes: A great Light Cone that Anaxa fulfills the requirements for easily.

Today Is Another Peaceful Day
✦✦✦✦
After entering battle, increases the wearer's DMG based on their Max Energy. Each point of Energy increases DMG by 0.2% / 0.25% / 0.3% / 0.35% / 0.4%. A max of 160 Energy will be taken into account for this.
Notes: Strictly worse than The Great Cosmic Enterprise, as they grant Anaxa the same amount of DMG% at S5, but this Light Cone grants less overall ATK.

Passkey
✦✦✦
After the wearer uses their Skill, additionally regenerates 8 / 9 / 10 / 11 / 12 Energy. This effect cannot be repeatedly triggered in a single turn.
Notes: This Light Cone has no damage amplification and grants no additional Ultimates. This Light Cone should be avoided at all costs. The only reason why it’s included here is to tell you not to use it!
Synergies
Premium Anaxa Hypercarry Team


2nd Slot (Action Advance units):

Cyrene
Cyrene's special Anaxa buff, Ode to Reason, provides him with a wealth of buffs. First, she grants Anaxa an immediate action with no speed tuning required. As long as Cyrene has at least 12 stacks of "Recollection", she can advance Anaxa at any point during the battle.Additionally, she restores 1 Skill Point while granting Anaxa 3 extra instances of his Skill, allowing him to fire up to 32-40 bullets in a single turn.
Check out this demonstration for how he can unleash 5 Skills in a row.Finally, Cyrene further boosts Anaxa with a substantial amount of ATK% and Skill DMG.

Sunday
He grants Anaxa twice the turns, DMG%, Energy, CRIT DMG, and CRIT Rate. With the addition of his Signature Light Cone, he provides hoards of SP and much more comfortability with rotations.

Bronya
Bronya is also a good option, providing Anaxa with twice the turns, DMG%, ATK, and CRIT DMG. However, she is much more SP intensive compared to Sunday; making additional SP sources much more valuable. E.g., Gallagher, The Herta's Signature Light Cone "Into the Unreachable Veil", 4PC Passerby of Wandering Cloud, etc.E2 Bronya:
Bronya becomes a fantastic teammate for Anaxa at E2. She grants Anaxa 30% SPD (equating to 29.1 SPD), thus allowing him to wear ATK boots. This means he only needs 105.9 SPD outside of combat to hit the 135 SPD breakpoint.For those who care about optimizing gameplay, the synergy between Bronya E2 + Robin has shown to be quite exceptional. Namely, this setup makes it possible to achieve 2 Robin Ults in the first cycle, given that they're both wearing Vonwacq. To achieve this, Bronya must advance Robin after her first turn. This allows Robin to gain enough Energy to use her Ultimate immediately, and her Ultimate should be back up and ready to use before the end of the first wave.

Sparkle
Sparkle, unfortunately, is the worst option among these supports–Anaxa loses twice the turns, and the SP seemingly becomes redundant. Additionally, she loses performance with Robin, as the initial immediate action she grants the team is worsened. She provides Anaxa with CRIT DMG, ATK%, and DMG%, similar to Bronya.
3rd Slot (DMG Amplifiers):

Cerydra
Cerydra's Skill grants Military Merit, which provides a moderate amount of CRIT DMG and All-Type RES PEN specifically for Anaxa's Skill, but her most impactful contribution is enabling Anaxa to occasionally use his Skill up to 4 times in a single turn. When paired with Cyrene, timing Military Merit together with Ode to Reason is a lethal combination.Compared to Robin, Cerydra offers a far more comfortable playstyle, largely due to her ease of use and significantly better uptime. Furthermore, her SPD buff allows Anaxa to equip ATK% boots without compromising the -1 playstyle, making her an overall more efficient partner for him in battle. For more calcs, please see camaraderia's Cerydra minisheet.How do I SPD tune Cerydra in an Anaxa Team?
Ideally, she is faster than him to ensure her Skill is used before his turn. Keep in mind that on her Skill, she grants herself and her target +20 SPD for 3 turns.
⟢ For SP economy, she may be played as a hyperspeed unit. This means she would require at least 140.1 SPD to achieve 160.1 SPD in combat.
⟢ You can also play her in a slower setup by equipping her with ATK% Boots for maximum buffs. Given that Sunday has 134 SPD, Anaxa will need 115 SPD and Cerydra 116 SPD; meaning they'd have 135 SPD and 136 SPD in combat respectively.

Robin
Robin’s team-wide DMG, Action Advance, and ATK buffs are all usable by Anaxa to 100% extent. Anaxa typically lacks ATK buffs and prefers SPD boots, making ATK buffers like Robin very valuable.

Tribbie
Tribbie alleviates Anaxa’s shortcomings against summoned enemies with her personal DMG, while providing him with numerous buffs. Additionally, against multiple targets, Tribbie can grant Anaxa many more turns.

Remembrance Trailblazer
With units like Bronya, Sunday, or Sparkle, RMC typically grants Anaxa “Mem’s Support”, adding a multiplier to his DMG whilst granting him CRIT DMG. It’s preferred that Anaxa uses a Slow build, with his Advance Support of choice run with a Hyperspeed build. This way, “Mem’s Support” won’t run out quickly. However, it is common for a regular “-1” Build to be used if Anaxa’s primary support is Sunday.

Ruan Mei
Ruan Mei’s combination of team-wide buffs brings very good personal DPR for Anaxa. That, combined with the Weakness Implant and Weakness Break Efficiency, creates great synergy between the two. Additionally, if E1 Ruan Mei is chosen, Anaxa’s DEF Shred and Ignore value increases further.

Pela
Pela’s DEF Shred synergizes well with Anaxa’s innate DEF Shred, alongside other shred sources such as Anaxa’s Signature Light Cone and Genius of Brilliant Stars, if available.

Tingyun
Tingyun grants Anaxa DMG% and ATK (which he lacks), as well as Energy, occasionally shortening his Ultimate rotations. It should be noted that her Benediction buff will expire quickly with units like Sunday and Bronya.
4th Slot (Sustains):

Dan Heng • Permansor Terrae
DHPT provides Anaxa with a substantial ATK buff and grants him the summon "Souldragon", which refreshes shields, cleanses, and advances forward whenever Anaxa attacks. Thanks to his high attack frequency, DHPT is a very comfortable, and free, sustain option.

Hyacine
A fantastic generalist healer that also deals solid personal damage. However, her max HP buffs are wasted on Anaxa. She is much better suited for Remembrance teams if you use them.

Huohuo
Huohuo grants team-wide Energy, ATK%, and Cleanse. However, her lack of SP efficiency may cause a few problems when played without units like Tribbie and Sunday.

Gallagher
The best free-to-play option with Anaxa. Gallagher mitigates Anaxa’s high SP-consumption, and is also able to provide him or units like Robin energy via Quid Pro Quo.

Fu Xuan
FX’s team-wide 12% CRIT Rate buff easily alleviates Anaxa’s CRIT Rate needs, however, her lack of SP efficiency may also be a burden for Anaxa and his primary support.

Aventurine
While Aventurine’s SP efficiency, personal damage, CRIT DMG, and Effect RES buffs are all astounding all-rounder bonuses, Aventurine may have to shift to rotations where he uses his Skill often. His shield may burn quickly on Anaxa, and (other than Tribbie), he isn’t frequently paired with units that don't use Follow-Up Attacks.

Lingsha
Lingsha’s high Toughness DMG, along with Anaxa’s Weakness implant, allows Lingsha to keep enemies Weakness Broken for a longer period. She doesn’t necessarily provide Anaxa with anything unique, though. Additionally, like Huohuo and Fu Xuan, her lack of SP efficiency may be a burden for Anaxa and his primary support.

Luocha
Still arguably the best Abundance unit in terms of pure healing through his Field, off-turn heals, and SP efficiency. Unfortunately, that’s all he provides, making him more of a “slap-on sustain” rather than one with specific synergies.
Anaxa + The Herta Guide


⟢Why play Anaxa with The Herta?
Anaxa was designed with our beloved Erudition Emanator, The Herta, in mind! So naturally, they have amazing synergy. She gets stronger with a second Erudition partner, and Anaxa is one of her best teammates. As we know, The Herta is an overall outstanding unit—but her main weakness can be seen in Single-Target scenarios. Fortunately, this gets circumvented by Anaxa as he happens to shine here!
Additionally, due to Anaxa's high attack frequency, The Herta's Ultimate turn-around and Interpretation stacking becomes more than satisfactory. And if that wasn't enough, he provides unconditionally good personal DMG, SP flexibility, and a teamwide 50% DMG Bonus from his A4 Trace "Imperative Hiatus".⟢ For more information about The Herta, please check out Herta Mains' The Herta Guide!
For detailed calculations, please see the following spreadsheets:
⟢ Anaxa + The Herta (camaraderia)
⟢ Anaxa + The Herta (maackia)

⟢ Is he worth pulling over Jade for The Herta?
Anaxa's pull value can increase/decrease based on what units you already own. The main determinants being:- Do you own Jade?
- Do you own Tribbie, Robin, or Sunday?
- Do you own Aventurine, Lingsha, or HuoHuo?The following list of scenarios will break down whether or not Anaxa is the most valuable pull for your account based off these factors:
✘ = You do not own the character
✔ = You do own the character
Scenario 1 ―
✘ Jade
✘ Tribbie / Robin / Sunday
✘ Aven / Lingsha / Huohuo
Anaxa's pull value here depends on whether Remembrance MC and Gallagher are available for your team.
- If RMC and Gallagher are available, Anaxa becomes your best pull.
- If they are unavailable, Tribbie becomes your best pull. It should be noted that if you are only using The Herta in AoE situations, Tribbie may be a better pull regardless of RMC's availability.
- If you have Luocha or Fu Xuan, use them and pull for Anaxa. If not, Aventurine, Lingsha, or Huohuo might have better value for your account over Anaxa.
Scenario 2 ―
✘ Jade
✘ Tribbie / Robin / Sunday
✔ Aven / Lingsha / Huohuo
If all you have is a premium sustain and...
- RMC is readily available, go get yourself an Anaxa.
- RMC is not available, please get Tribbie.
Scenario 3 ―
✘ or ✔ Jade
✔ Tribbie / Robin / Sunday
✔ Aven / Lingsha / Huohuo
- Get Anaxa! He’s the only upgrade left besides Eidolons.
Scenario 4 ―
✔ Jade
✘ Tribbie / Robin / Sunday
✘ or ✔ Aven / Lingsha / Huohuo
- Get Tribbie, even if you're stuck using Luocha or Fu Xuan. Tribbie is a flexible Harmony for other units, and the upgrade from RMC to Tribbie is a higher DPS increase than Jade to Anaxa. Tribbie also has amazing synergy with Jade, as sometimes you’d rather put Debt Collector on Tribbie for max stacks.
Scenario 5 ―
✘ or ✔ Jade
✔ Tribbie / Robin / Sunday
✘ Aven / Lingsha / Huohuo
- It depends on which sustains you have available aside from Gallagher. If your Gallagher is free, by all means get Anaxa. If you have Luocha or Fu Xuan, Anaxa is still recommended. Players stuck using Bailu or Gepard should get a limited sustain.
If you have questions, please join our Discord Server & ask our team in the Theorycrafting Section!
Main Stats & Sub Stats
Main Stats
Body - CRIT Rate > CRIT DMG
Boots - SPD > ATK
Planar Sphere - ATK > Wind DMG%
Link Rope - ATK ≥ ERR

Planar Sphere: ATK% or DMG%?
ATK% is preferred, as Anaxa possesses a lot of sources of DMG% (Skill Passive, Minor Traces, Erudition Buff from his A2 Trace, Light Cones), excluding supportive allies. The difference isn’t very profound, though, so prioritize the Planar Sphere with the best substats.
Sub Stats
SPD (until desired breakpoint) > CRIT Rate ≥ CRIT DMG > ATK% > Flat ATKNotes:
CRIT Rate > CRIT DMG: The Herta already provides 80% CRIT DMG, further increasing the value of CRIT Rate.
SPD > ATK: The Herta wants as much Energy as possible, and you’ll get that via more turns.Important SPD Breakpoints to take note of:
⟢ 134 - 2 actions in the first cycle
⟢ 143 - 5 actions in the first two cycles
Regarding ERR:
⟢ Often, when playing Anaxa, your Energy will be at 125/140 (2 Skills, 2 Talents, 1 Ultimate, across two turns). Between these two turns, you will usually gain enough Energy to be at 140 for a 2-turn Ultimate.In scenarios where Energy gained by being hit by an enemy (Hit Energy) is scarce, using the same set-up with an ERR% Rope (2 Skills, 2 Talents, 1 Ultimate, across two turns), will turn the previous 125/140 into 149/140, equating to a 2-turn Ultimate without Hit Energy.However, his Signature Light Cone does give him a clean 2-turn ult, without the addition of ERR (145/140). Players shouldn’t use the two together.
TL;DR - ERR is better without Hit Energy, ATK% is better with. Most scenarios provide enough Hit Energy for an ERR% Rope to be redundant, making an ATK% Rope much more consistent. May fluctuate in scenarios with little to no Hit Energy.

Art by @anaxadoodles
Relic Sets

Eagle of Twilight Line
2PC: +10% Wind DMG%
4PC: After the wearer uses their Ultimate, their action is Advanced Forward by 25%.
Notes: Best overall set with The Herta across all enemy target counts. Additionally, this team performs best with a source of constant Action Advance, like Tribbie on Dance Dance Dance!

Scholar Lost in Erudition
2PC: +8% Crit Rate.
4PC: Increases DMG dealt by Skill and Ultimate by 20%. After using Ultimate, additionally increases the DMG dealt by the next Skill by 25%.
Notes: Beware, the 25% DMG bonus does not apply to the additional Skill, as the first Skill has already been buffed.

Pioneer Diver of Dead Waters
2PC: +12 DMG% against debuffed enemies.
4PC: Increases CRIT Rate by 4%. The wearer deals 8%/12% increased CRIT DMG to enemies with at least 2/3 debuffs. After the wearer inflicts a debuff on enemy targets, the aforementioned effects increase by 100%, lasting for 1 turn(s).
Notes: Anaxa thankfully has 100% uptime on everything this set has to offer, making it not only an incredibly potent option for him but also an extremely consistent option. Has a great spot in The Herta teams, especially due to Anaxa losing potential CRIT DMG from his A2 trace.

Genius of Brilliant Stars
2PC: +10% Quantum DMG%
4PC: When the wearer deals DMG to the target enemy, ignores 10% DEF. If the target enemy has Quantum Weakness, the wearer additionally ignores 10% DEF.
Notes: Anaxa will benefit from the 4PC Bonus due to his ability to implant Quantum Weakness onto enemies. As DEF reduction would ensue, this Relic Set gets better the more DEF Shred sources exist in the team (Pela, Genius of Brilliant Stars, E1 Ruan Mei, etc).

2PC/2PC
An amalgamation of the sets above with the addition of +6% SPD.
Notes: It’s quite hard to prefer 2PC/2PC sets over 4PC sets unless your substats are stellar.
Final notes regarding Relic Sets:
Most sets perform similarly, making substat optimization more valuable than the Relic Set of choice. While Eagle excels in The Herta-centric teams, its performance is synonymous with other options elsewhere. Players should prioritize giving Anaxa flexible options depending on their preexisting needs.
Planar Ornaments

Rutilant Arena
2PC: Increases the wearer's CRIT Rate by 8%. When the wearer's current CRIT Rate reaches 70% or higher, DMG dealt by Basic ATK and Skill increases by 20%.
Notes: An inferior version of Izumo in terms of pure stats, but with a more universal condition. Assuming your CRIT Rate is above 70%, Rutilant is your go-to “slap on” option for Anaxa.

Izumo Gensei and Takama Divine Realm
2PC: Increases the wearer's ATK by 12%. When entering battle, if at least one teammate follows the same Path as the wearer, then the wearer's CRIT Rate increases by 12%.
Notes: Both the ATK% and CRIT Rate buffs are great, specifically the ATK% that he lacks from a lot of his kit.

Lushaka, the Sunken Seas
2PC: Increases the wearer's Energy Regeneration Rate by 5%. If the wearer is not the first character in the team lineup, then increases the ATK of the first character in the team lineup by 12%.
Notes: The 5% Energy Regeneration Rate offers almost no benefits for Anaxa, even in situations where hit-based Energy gain is absent. Make sure to put The Herta in the first slot of the party.

Sprightly Vonwacq
2PC: Increases the wearer's Energy Regeneration Rate by 5%. When the wearer's SPD reaches 120 or higher, the wearer's action is Advanced Forward by 40% immediately upon entering battle.
Notes: The 120 SPD requirement is something to overlook, since SPD boots are almost always preferred with Anaxa. An interesting option for 0-cycles and The Herta-Battery playstyles, with the caveat of further restricting his solid DMG output.
Final notes regarding Planar Ornaments:
Izumo will be your go-to for Herta teams, especially since you may have leftover Izumo pieces from farming. Keep in mind that these sets only provide a small increase over Rutilant, meaning Rutilant is still your go-to for consistency in case of playing Anaxa outside The Herta/Double Erudition teams.
Light Cones

Life Should Be Cast to Flames
✦✦✦✦✦
When the wearer's turn starts, regenerates 10 Energy. If the enemy target has a Weakness implanted by the wearer, increases the wearer's DMG dealt to it by 60% / 70% / 80% / 90% / 100%.
When an enemy target gets attacked by the wearer, the wearer decreases the target's DEF by 12% / 15% / 18% / 21% / 24%, lasting for 2 turn(s). The same types of effects cannot stack.
Notes: This Light Cone’s Energy passive allows for a clean 2-turn Ultimate without any extra Hit Energy. Its value increases with additional DEF Shred sources such as Pela, Genius of Brilliant Stars, E1 Sunday, and E1 Ruan Mei.

Into the Unreachable Veil
✦✦✦✦✦
Increases the wearer's CRIT Rate by 12% / 14% / 16% / 18% / 20%. When the wearer uses their Ultimate, increases DMG dealt by the wearer's Skill and Ultimate by 60% / 70% / 80% / 90% / 100%, lasting for 3 turn(s). After the wearer uses their Ultimate, if this Ultimate consumed 140 or more Energy, recovers 1 Skill Point.
Notes: Unless you have an extra one on hand, you should keep this Light Cone on The Herta.

The Great Cosmic Enterprise
✦✦✦✦
Increases the wearer's ATK by 8% / 10% / 12% / 14% / 16%. For every 1 different Weakness Type an enemy target has, increases the DMG dealt to it by the wearer by 4% / 5% / 6% / 7% / 8%. Up to a max of 7 Weakness Types can be taken into account for this effect.
Notes: An outstanding Free-to-Play option that you can max superimpose, and performs better than some 5-Star options. If The Herta doesn’t have her Signature Light Cone, she can benefit greatly from Anaxa wearing this.

Before Dawn
✦✦✦✦✦
Increases the wearer's CRIT DMG by 36% / 42% / 48% / 54% / 60%. Increases DMG dealt by the wearer's Skill and Ultimate by 18% / 21% / 24% / 27% / 30%. After the wearer uses Skill or Ultimate, gains Somnus Corpus. Upon triggering a Follow-up ATK, consumes Somnus Corpus, and increases DMG dealt by Follow-up ATK by 48% / 56% / 64% / 72% / 80%.
Notes: Anaxa does not benefit from the Follow-Up Attack buff. Despite that drawback, it’s still arguably the best stat stick for Anaxa.

Night on the Milky Way
✦✦✦✦✦
For every enemy on the field, increases the wearer's ATK by 9% / 10.5% / 12% / 13.5% / 15%, up to 5 stacks. When an enemy is inflicted with Weakness Break, the DMG dealt by the wearer increases by 30% / 35% / 40% / 45% / 50% for 1 turn.
Notes: Worse performance in lower target scenarios. Due to Anaxa’s Weakness Type application, this Light Cone’s DMG% uptime is ideally increased.
Eternal Calculus
✦✦✦✦✦
Increases the wearer's ATK by 8% / 9% / 10% / 11% / 12%. After using an attack, for each enemy target hit, additionally increases ATK by 4% / 5% / 6% / 7% / 8% . This effect can stack up to 5 times and last until the next attack. If there are 3 or more enemy targets hit, this unit's SPD increases by 8% / 10% / 12% / 14% / 16%, lasting for 1 turn(s).
Notes: Worse performance in lower target scenarios. This Light Cone’s SPD buff cannot be obtained in scenarios with fewer than 3 targets.

Today Is Another Peaceful Day
✦✦✦✦
After entering battle, increases the wearer's DMG based on their Max Energy. Each point of Energy increases DMG by 0.2% / 0.25% / 0.3% / 0.35% / 0.4%. A max of 160 Energy will be taken into account for this.
Notes: Strictly worse than The Great Cosmic Enterprise as they give the same DMG% at S5, but this Light Cone grants less overall ATK.

Passkey
✦✦✦
After the wearer uses their Skill, additionally regenerates 8 / 9 / 10 / 11 / 12 Energy. This effect cannot be repeatedly triggered in a single turn.
Notes: Anaxa’s Talent does not trigger this passive. Unlike his Signature Light Cone, this extra Energy does not affect Anaxa’s performance in scenarios with scarce Hit Energy. The worst option possible.
Synergies
Premium Anaxa + The Herta Team


The Herta’s brand new premium team replaces Jade with Anaxa. This team contains units with high-attack frequency and AoE attacks, maximizing her Energy gain. Anaxa’s Weakness Implant and High ST DMG solves a lot of Jade's shortcomings.
3rd Slot (DMG Amplifiers):

Tribbie
Tribbie’s synergy with The Herta already popped off without Anaxa, but his Sub-DPS playstyle allows Tribbie’s teamwide buffs to shine brighter compared to more battery-type Erudition partners.

Remembrance Trailblazer
While RMC typically does not give Anaxa “Mem Support”, her CRIT DMG buff still applies to him. Both Anaxa and RMC have very flexible SP usage, essentially supporting each other indirectly.

Robin
Robin’s teamwide DMG, Action Advance, and ATK buffs are all usable by Anaxa to 100% extent. Anaxa typically lacks ATK buffs and prefers SPD boots, making ATK buffers like Robin highly valuable.

Sunday
Sunday and Anaxa typically have no direct synergy in The Herta teams, as Sunday should buff The Herta over him. However, Sunday’s value for The Herta is still extremely high, creating a solid team even with a lack of buffs on Anaxa himself.

Ruan Mei
Ruan Mei’s combination of teamwide buffs brings very good Personal-DPR for Anaxa. That, combined with the Weakness Implant and Break Efficiency creates great synergy amongst the two, even if Ruan Mei does not buff The Herta as much as other units. Plus, she's free!

Pela
Pela’s DEF Shred synergizes well with Anaxa’s innate DEF Shred, alongside other shred sources such as his Signature Light Cone and Genius of Brilliant Stars if available.
Notes: Unlike Hypercarry team compositions, The Herta teams have DMG sources outside Anaxa. Ideally, all units get buffed, therefore, team-wide buffers like Tribbie and Robin are preferred.
4th Slot (Sustains):

Lingsha
Lingsha’s Break-Based abilities, AoE DMG, and High Attack Frequency capitalize on both The Herta’s Energy stacking mechanics and Anaxa’s Weakness Implant. Her only weakness is SP deficiency, as ideally, she’s using her Skill as much as possible.

Gallagher
The undisputed goat of sustain, everything that makes Gallagher great applies to Anaxa and The Herta. Gallagher’s SP-efficiency and Energy-manipulation via Quid Pro Quo make an amazing four-star unit.

Aventurine
Aventurine’s SP Efficiency, High Attack Frequency, CDMG and Effect RES buffs are all amazing all-rounder buffs, great for any DMG dealer. Playing with Tribbie (which you should be if possible) also gives Aventurine more stacks through Follow-Up Attacks.

Huohuo
To this day, Huohuo still has the best buffs that any sustain can offer, granting team-wide Energy, ATK, and Cleanse. However, her SP Neutrality/Deficiency may cause a few problems when played with The Herta and Anaxa, and her healing is not to the level of other sustains. She also lacks the Attack Frequency of other sustains.

Fu Xuan
Fu Xuan’s team-wide 12% CRIT Rate Buff and Crowd Control Resist are all very valuable in Dual-DPS teams. However, her uptime requires efficient SP usage.

Luocha
Still arguably the best Abundance unit in terms of pure healing through his Field, off-turn heals, and SP-efficiency. Unfortunately, that’s all he provides, making him more of a “slap-on sustain” rather than one with specific synergies.
Notes: Gallagher is really strong already, often beating most 5-Star sustains like Fu Xuan and Luocha. Units like Aventurine and Huohuo are mostly luxury options if Gallagher is being used, while Lingsha is almost a strict upgrade.
Breaknaxa

⟢ Why play Anaxa with Break?
While not his optimal build in most content, Breaknaxa comps are a fun alternative to the traditional CRIT DPS play styles. It can be useful in Anomaly Arbitration stages that reduce CRIT DMG, and you can have fun in Divergent Universe with a combination of Harmony, Propagation, and Hunt blessings.

Main Stats & Sub Stats
Main Stats
Body - In general, prioritize Break Effect and SPD sub stats over the main stat. However, if you're minmaxing for damage, you may run a CRIT Rate main stat Body.
Boots - SPD
Planar Sphere - Again, prioritize Break Effect and SPD sub stats. For minmaxing, you may run an ATK% Sphere. Elemental DMG does not affect Break DMG.
Link Rope - Break Effect
Sub Stats
SPD (until desired breakpoint) > Break Effect >>> CRIT Rate > ATK% > CRIT DMGNotes:
Sub stats are generally more important than main stats for a Break build, with Break Effect and SPD being the highest priority. If you are playing Breaknaxa without a sustain, HP% and DEF% main stats are more desirable for survivability.For breakpoints, aiming for 160 SPD in combat is a solid goal. If you're using Eagle, 150 SPD will perform similarly to 200 SPD, as long as you reliably cast Ultimate every 2 turns. This setup often requires his Signature Light Cone.
Relic Sets

Eagle of Twilight Line
2PC: Increases Wind DMG by 10%.
4PC: After the wearer uses their Ultimate, their action is Advanced Forward by 25%.
Notes: Anaxa has substantial DEF shred from his Talent and Signature (and E1 if applicable), and his premium Break supports add so much more that you’re likely to overcap. As such, Eagle becomes a much more desirable set for the extra actions. It's even better with other sources of Action Advance like Dance! Dance! Dance! or E2 Fugue.

Iron Cavalry Against the Scourge
2PC: Increases Break Effect by 16%.
4PC: If the wearer's Break Effect is 150% or higher, the Break DMG dealt to the enemy target ignores 10% of their DEF. If the wearer's Break Effect is 250% or higher, the Super Break DMG dealt to the enemy target additionally ignores 15% of their DEF.
Notes: Typically the go-to set for Break DPS, providing both BE and DEF shred. However, reaching the 250% BE benchmark without compromising SPD is very difficult unless you’re using Charmony Fall (S5). Overcapping on DEF shred may also be an issue depending on your setup.

Genius of Brilliant Stars
2PC: Increases Quantum DMG by 10%.
4PC: When the wearer deals DMG to the target enemy, ignores 10% DEF. If the target enemy has Quantum Weakness, the wearer additionally ignores 10% DEF.
Notes: A good and universal set for Anaxa, however similar to Iron Cavalry, be cautious about overcapping on DEF shred.

Thief of Shooting Meteor
2PC: Increases Break Effect by 16%.
4PC: Increases the wearer's Break Effect by 16%. After the wearer inflicts Weakness Break on an enemy, regenerates 3 Energy.
Notes: Less effective in Single-Target scenarios due to fewer enemies being inflicted with Weakness Break.

2PC/2PC Combinations
Break Effect and/or SPD
Notes: These combinations work if they help you reach desired breakpoints.
Planar Ornaments

Forge of the Kalpagni Lantern
2PC: Increases the wearer's SPD by 6%. When the wearer hits an enemy target that has Fire Weakness, the wearer's Break Effect increases by 40%, lasting for 1 turn(s).
Notes: A fantastic set that Anaxa can make use of thanks to his ability to implant all 7 Weakness Types. The additional SPD also helps with reaching desired breakpoints.

Talia: Kingdom of Banditry
2PC: Increases the wearer's Break Effect by 16%. When the wearer's SPD reaches 145 or higher, the wearer's Break Effect increases by an extra 20%.
Notes: Since you want to run Anaxa with high SPD, the extra Break Effect from this set is much appreciated.
Light Cones

Life Should Be Cast to Flames
✦✦✦✦✦
When the wearer's turn starts, regenerates 10 Energy. If the enemy target has a Weakness implanted by the wearer, increases the wearer's DMG dealt to it by 60% / 70% / 80% / 90% / 100%.
When an enemy target gets attacked by the wearer, the wearer decreases the target's DEF by 12% / 15% / 18% / 21% / 24%, lasting for 2 turn(s). The same types of effects cannot stack.
Notes: The additional Energy and DEF shred this Light Cone provides is very useful in Break teams.

After the Charmony Fall
✦✦✦✦
Increases the wearer's Break Effect by 28% / 35% / 42% / 49% / 56%. After the wearer uses Ultimate, increases SPD by 8% / 10% / 12% / 14% / 16%, lasting for 2 turn(s).
Notes: This Light Cone performs similarly to his Signature in terms of damage at S5, but the Energy Regeneration from his Signature is much more comfortable. However, the additional Break Effect can help with reaching the 150%/250% BE requirement for the Iron Cavalry Relic Set.
Synergies
Premium Breaknaxa Team


ㅤㅤㅤㅤㅤ

The Dahlia
The Dahlia is essential for Break teams, enabling Super Break damage outside of the Weakness Broken state.She grants the team 50% Weakness Break Efficiency and 18% DEF shred, along with extra buffs for herself and her "Dance Partner". This includes higher Super Break multipliers and a 30% SPD buff that Anaxa can keep up 100% of the time.If you run a sustain, The Dahlia provides team-wide Break Effect when receiving healing and/or shielding, which is a nice bonus.When it comes to building her, she is a pure SPD and Break Effect demon.Her Signature Light Cone is optional, but it refunds a Skill Point on her Ultimate, which is great QoL for a Skill-based DPS like Anaxa. Other options include Resolution Shines As Pearls of Sweat or Solitary Healing.

Fugue
Fugue’s biggest contribution to Break teams is her “Cloudflame Luster,” which gives all enemies a second toughness bar, allowing them to be Weakness Broken twice. She also provides team-wide Break Effect and enables Super Break damage.Her Skill buffs an ally’s Break Effect and enables toughness reduction regardless of Weakness Type, which unfortunately gets little mileage with Anaxa due to his Omni-Weakness Implant. However, her EBA provides 18% DEF shred which is always appreciated. Because of the hit chance on her EBA, Fugue requires 67% Effect Hit Rate, alongside the usual SPD and Break Effect stats.Her Light Cone is optional, and she can comfortably run Resolutions Shines as Pearls of Sweat or Before the Tutorial Mission Starts.

Ruan Mei
While not as powerful an amplifier as The Dahlia or Fugue, Ruan Mei provides team-wide 50% Weakness Break Efficiency, 10% SPD, and RES-PEN; all of which provide valuable utility in a Break team.Her Break action delay is very helpful for sustainless setups. Furthermore, now that she’s available in the shop, her Eidolons are quite accessible. Most notably, her E1 provides an additional 20% DEF shred, which becomes more powerful by stacking additional sources of DEF shred up to 100%.Her Signature Light Cone is optional, Dance! Dance! Dance! and Memories of the Past are right there and waiting for you. The Nameless Honor option In Pursuit of the Wind is also a great choice if you have it.

Harmony Trailblazer
Free unit that provides the entire team with Break Effect and huge Super Break multipliers when enemies are Weakness Broken.Their Energy Regeneration trace makes them an excellent Dance! Dance! Dance! holder, and their action delay trace can help contribute to survival in a sustainless setup.Because their Skill is Bounce, they can struggle in AoE scenarios, but they shred toughness in Single-Target situations. Their biggest drawback is that their core damage amplification, Super Break, is locked behind the enemies being Weakness Broken.

Lingsha
A luxury pull for most Break teams, it’s generally encouraged to obtain Dahlia E1 and/or Fugue E1 before adding Lingsha to the roster. However, she is a flexible unit who can simultaneously sustain and sub-DPS. Give her the right tools, and she becomes an effective carry for AoE content, while keeping the team alive.With some conscientious Skill Point management, Anaxa and Lingsha can be a formidable dual-DPS set up. Anaxa excels in Single-Target scenarios but struggles in AoE, while Lingsha is the opposite - shining in AoE but lacking in Single-Target situations. Together, they cover each other’s shortcomings. As an added bonus, Anaxa enables Lingsha to consistently Break enemies through his Omni-Weakness implant.On top of her team healing and consistent cleanse, Lingsha can support the team by causing enemies to receive 25% increased Break damage on her Ultimate.Her Signature Light Cone is optional, having many 4 star alternatives such as Dream’s Montage, Shared Feeling, Quid Pro Quo, What is Real, and Post-Op Conversation. Luocha’s Signature is also a great option due to her attack scaling and frequent AoE hits.Also, her bunny is cute. 🥺